Home
› Lcd Wiring Diagram Arduino : Arduino 16x2 LCD Black Boxes - Arduino Stack Exchange : Before wiring the lcd screen to your arduino uno or genuino board we suggest to solder a pin header strip to the 14 (or 16) pin count connector of the lcd screen.
Lcd Wiring Diagram Arduino : Arduino 16x2 LCD Black Boxes - Arduino Stack Exchange : Before wiring the lcd screen to your arduino uno or genuino board we suggest to solder a pin header strip to the 14 (or 16) pin count connector of the lcd screen.
Lcd Wiring Diagram Arduino : Arduino 16x2 LCD Black Boxes - Arduino Stack Exchange : Before wiring the lcd screen to your arduino uno or genuino board we suggest to solder a pin header strip to the 14 (or 16) pin count connector of the lcd screen.. The resistor in the diagram above sets the backlight brightness. Want your arduino projects to display status messages or sensor readings? Lcds like these are very popular and broadly used in electronics projects as they are good for displaying information like sensors data from your project, and also they are very cheap. The liquid crystal library allows you to control lcd displays that are compatible with the hitachi hd44780 driver. The circuit diagram of interfacing lcd to arduino for displaying a text message is shown below.
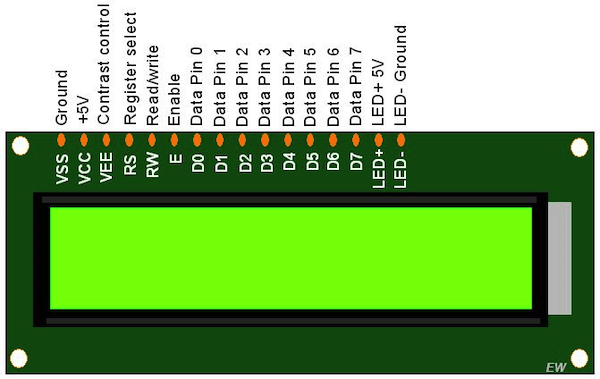
Lcd displays available in various sizes 8×1, 16×1, 16×2, 16×4, 20 char x 4 lines. These displays can be wired in either 4 bit mode or 8 bit mode. The resistor in the diagram above sets the backlight brightness. This tutorial includes datasheet, working, pinout, wiring/schematic, code & custom character generation. In this arduino lcd tutorial we will learn how to connect an lcd (liquid crystal display) to the arduino board.
Arduino I2C LCD Backpack Introductory Tutorial from www.electroschematics.com Learn interfacing 16x2 lcd module with arduino uno. For a written version of all the physical connections which you this represents all the wiring that must be done from the arduino board to the lcd. The circuit diagram of interfacing lcd to arduino for displaying a text message is shown below. In order to control the lcd and display characters, you will need to add a few extra connections. Lcd displays available in various sizes 8×1, 16×1, 16×2, 16×4, 20 char x 4 lines. Before wiring the lcd screen to your arduino uno or genuino board we suggest to solder a pin header strip to the 14 (or 16) pin count connector of the lcd screen. Wiring the lcd in 4 bit mode is usually preferred since it uses four less wires than 8 bit follow the diagram below to wire the lcd to your arduino: Then these lcd displays might be the perfect fit.
The liquid crystal library allows you to control lcd displays that are compatible with the hitachi hd44780 driver.
How lcd works, how to connect lcd to arduino, how to program arduino step by step. I simply followed the instructions and wiring diagram in the arduino character. Wiring the lcd in 4 bit mode is usually preferred since it uses four less wires than 8 bit follow the diagram below to wire the lcd to your arduino: Arduino uno or compatible wiring. Before wiring the lcd screen to your arduino board we suggest to solder a pin header strip to the 14 (or 16) pin count connector of the lcd screen. For a written version of all the physical connections which you this represents all the wiring that must be done from the arduino board to the lcd. The liquid crystal library allows you to control lcd displays that are compatible with the hitachi hd44780 driver. Want your arduino projects to display status messages or sensor readings? In this arduino lcd tutorial we will learn how to connect an lcd (liquid crystal display) to the arduino board. To wire up the hd44780 lcd to the arduino, we wire it according to the diagram below: Lcd displays available in various sizes 8×1, 16×1, 16×2, 16×4, 20 char x 4 lines. Since the display is quite large, we found that drawing would seem really slow if using 'software' spi. This tutorial includes datasheet, working, pinout, wiring/schematic, code & custom character generation.
Since the display is quite large, we found that drawing would seem really slow if using 'software' spi. In 16x2 lcd there are 16 pins over all if there is a back light, if there is no back the above figure shows the circuit diagram of 16x2 lcd connected to arduino uno. For that reason, we'll show primarily how to wire up digital 10 (53 on arduino mega) must also be an output (but doesn't need to be connected to any particular pin). Wiring the lcd in 4 bit mode is usually preferred since it uses four less wires than 8 bit follow the diagram below to wire the lcd to your arduino: For a written version of all the physical connections which you this represents all the wiring that must be done from the arduino board to the lcd.
Use I2C to Control LCD Module with Arduino from blog.techdesign.com Before wiring the lcd screen to your arduino uno or genuino board we suggest to solder a pin header strip to the 14 (or 16) pin count connector of the lcd screen. A typical value is 220. Now all we have to do is write the code (instructions) that the. This tutorial includes datasheet, working, pinout, wiring/schematic, code & custom character generation. Wiring the lcd in 4 bit mode is usually preferred since it uses four less wires than 8 bit follow the diagram below to wire the lcd to your arduino: This article focuses on wiring an arduino to a character lcd and a graphic lcd, and includes static and animated demos connecting a character lcd and programming it was a breeze and i didn't run into any problems. For that reason, we'll show primarily how to wire up digital 10 (53 on arduino mega) must also be an output (but doesn't need to be connected to any particular pin). Before wiring the lcd screen to your arduino board we suggest to solder a pin header strip to the 14 (or 16) pin count connector of the lcd screen.
Lcds like these are very popular and broadly used in electronics projects as they are good for displaying information like sensors data from your project, and also they are very cheap.
This library can handle both 4 bit mode and 8 bit mode wiring of lcd. Lcd displays available in various sizes 8×1, 16×1, 16×2, 16×4, 20 char x 4 lines. Wiring the lcd in 4 bit mode is usually preferred since it uses four less wires than 8 bit follow the diagram below to wire the lcd to your arduino: Want your arduino projects to display status messages or sensor readings? How lcd works, how to connect lcd to arduino, how to program arduino step by step. Then these lcd displays might be the perfect fit. Arduino uno or compatible wiring. In 16x2 lcd there are 16 pins over all if there is a back light, if there is no back the above figure shows the circuit diagram of 16x2 lcd connected to arduino uno. This article focuses on wiring an arduino to a character lcd and a graphic lcd, and includes static and animated demos connecting a character lcd and programming it was a breeze and i didn't run into any problems. The liquid crystal library allows you to control lcd displays that are compatible with the hitachi hd44780 driver. For that reason, we'll show primarily how to wire up digital 10 (53 on arduino mega) must also be an output (but doesn't need to be connected to any particular pin). In this arduino lcd tutorial we will learn how to connect an lcd (liquid crystal display) to the arduino board. Since the display is quite large, we found that drawing would seem really slow if using 'software' spi.
To interface a lcd to the arduino uno, we. The circuit diagram of interfacing lcd to arduino for displaying a text message is shown below. These displays can be wired in either 4 bit mode or 8 bit mode. This tutorial includes datasheet, working, pinout, wiring/schematic, code & custom character generation. In order to control the lcd and display characters, you will need to add a few extra connections.
How to Connect the STM32 "Blue Pill" to a 16x2 LCD Module | Arduino | Maker Pro from maker.pro The resistor in the diagram above sets the backlight brightness. This library can handle both 4 bit mode and 8 bit mode wiring of lcd. How lcd works, how to connect lcd to arduino, how to program arduino step by step. To interface a lcd to the arduino uno, we. For a written version of all the physical connections which you this represents all the wiring that must be done from the arduino board to the lcd. These displays can be wired in either 4 bit mode or 8 bit mode. Before wiring the lcd screen to your arduino uno or genuino board we suggest to solder a pin header strip to the 14 (or 16) pin count connector of the lcd screen. Check the wiring diagram below and the pinout table from the /* example sketch to create and display custom characters on character lcd with arduino and liquidcrystal library.
To wire up the hd44780 lcd to the arduino, we wire it according to the diagram below:
Before wiring the lcd screen to your arduino uno or genuino board we suggest to solder a pin header strip to the 14 (or 16) pin count connector of the lcd screen. To wire up the hd44780 lcd to the arduino, we wire it according to the diagram below: Since the display is quite large, we found that drawing would seem really slow if using 'software' spi. To interface a lcd to the arduino uno, we. Learn interfacing 16x2 lcd module with arduino uno. The resistor in the diagram above sets the backlight brightness. Now all we have to do is write the code (instructions) that the. The liquid crystal library allows you to control lcd displays that are compatible with the hitachi hd44780 driver. Before wiring the lcd screen to your arduino board we suggest to solder a pin header strip to the 14 (or 16) pin count connector of the lcd screen. This library can handle both 4 bit mode and 8 bit mode wiring of lcd. In this arduino lcd tutorial we will learn how to connect an lcd (liquid crystal display) to the arduino board. These displays can be wired in either 4 bit mode or 8 bit mode. These all displays can be interfaced using this tutorial.